Monday, December 25, 2023

2024 Interior Alaska Beekeeping Workshop

When: March 2nd & 3rd, 2024

Time: 1:00PM - 6:00PM both days for a total of 10 hours

Venue: Monroe Catholic School; 615 Monroe Street; Fairbanks, AK 99701

Instructors: 

Dawn Cogan, M.Ed. Education Leadership; B.S. Communications Management

James & Lisa Harlow - Successful Wintering


Registration Link:

https://forms.office.com/r/hfbE0ZNUif


Syllabus: 

What is responsible beekeeping? How much honey will I harvest?
What is the start-up cost?
• Equipment necessary to keep bees in Alaska
• Biology and races of honeybees
• Members of the hive and their duties
• Colony Management techniques & tricks
• Where to obtain bee equipment. New, used or building your own equipment.
• Preparing equipment for the arrival of bees - Insulation, feeding bees properly
• What to do when the bees arrive
• Is my queen marked? (queen marking tool)
• Running 2-Queen Hives
• Swarming and how to prevent it
• Honeybee diseases
• Extracting your Alaska honey
• Wintering Honeybees 
• Storing your equipment
• Beeswax candle making, lip balm, and lotion bar manufacturing
Hands-on Projects:
1) Management of honeybee colonies in Alaska, The Beekeeper's Calendar
2) Constructing a hive in class
3) Colony Collaboration team exercise

Cost per family: $185.00
Includes your own copy of our Beekeeping Handout Book
Door prizes: 1 free package of live honeybees, miscellaneous beekeeping tools, a free consultation with Dawn Cogan, a free extraction tools rental

Thursday, August 3, 2023

Wrapping up the Season

If you don't plan to winter your honeybees, you should cage your queen(s). This will ensure you won't have eggs and larva in your honey when you extract honey. It will take approximately 24 days for all the brood to hatch out of the honeycomb. Keeping the queen alive helps the colony to continue to produce honey from fall nectar and decreases swarming and/or queen rearing. Keep doing hive checks every ten days to prevent colonies from creating new queens. 

After you take all the honey frames and extract them, give all the sticky frames back to the bees to be cleaned up for about a week. Storing equipment that is clean, without dead brood or sticky frames make starting subsequent seasons much better.

Once equipment is clean, you can either winter the bees or shop vacuum and recycle them in a compost or garden bed. Their soft organs become part of a rich garden soil while their exoskeletons become a lightweight, organic vermiculite that aerates the soil. 

All equipment should be stacked upon a bottom board with a queen excluder between the bottom board and the bottom brood box. This will keep rodents from eating the honeycomb and building nests inside the boxes during winter months. I always store my equipment outdoors, under the eaves of my house. This prevents mold and mildew on the honeycomb frames.

If you wish to winter colonies, you must control several variables:

1) Space - Reduce the colony down to one brood box. This will help them stay warmer as they cluster in winter months.

2) Food - Remove all honey as this is too nutrient rich, causing compacted bowels. Feed 2:1 ratio sugar to water so the bees can store in honeycomb cells for winter. The best way I've found is to use an inverted bucket on the outside of a telescoping cover with a one inch hole in the middle of the lid. 

https://www.betterbee.com/feeders/fp0-one-gallon-feeder-pail.asp?mkwid=&pcrid=&pkw=&pmt=&pdv=c&gclid=CjwKCAjw_aemBhBLEiwAT98FMpofwavooz6Ib7N_KyS7Kq4jQRQiDMn2Y7pfyup4onpHilBMSEVdJhoCaSsQAvD_BwE

A sugar candy board will be added above the brood box later in October. Sugar candy board is made with granulated sugar, vinegar and water. 


3) Treat for mites using oxalic acid (wood bleach). This is done using a car battery and an oxalic acid vaporizer tool:


https://www.amazon.com/AUNMAS-Vaporizer-Evaporator-Beekeeping-Fumigation/dp/B082D8F1VG/ref=sr_1_3?crid=3NWUBV2NRSBUO&keywords=oxalic+acid+fumigation+tool&qid=1691044838&sprefix=occelic+acid+f4umigation+tool%2Caps%2C268&sr=8-3

This should be done every two weeks for a total of three treatments.

4) About the middle of October in Fairbanks, Alaska, it's time to move colonies into a bee shed that is super insulated with the following:

    *A heat source that keeps temperatures between 35* and 38*:
https://www.amazon.com/Dreo-Radiator-Electric-Protection-Thermostat/dp/B096FQYFBJ/ref=sr_1_2_sspa?crid=UVER9YYIIVA3&keywords=oil+drip+electric+heater&qid=1691045593&sprefix=oil+drip+electric+heate%2Caps%2C201&sr=8-2-spons&ufe=app_do%3Aamzn1.fos.f5122f16-c3e8-4386-bf32-63e904010ad0&sp_csd=d2lkZ2V0TmFtZT1zcF9hdGY&psc=1

    *Temperature monitoring: https://physitemp.com/electrotherms_p224

    * Humidity: Purchase several DryRid buckets from a local hardware store and hang or place in the wintering shed. Other ways to absorb moisture are charcoal or wood shavings above each brood chamber.

    * Govee Temperature and Humidity monitor that sets on the candy board:
https://us.govee.com/products/wi-fi-temperature-humidity-sensor?currency=USD&variant=37592920686777&utm_medium=cpc&utm_source=google&utm_campaign=Google%20Shopping&utm_source=google&utm_medium=cpc&gclid=CjwKCAjw_aemBhBLEiwAT98FMkvOjEoba5fnYh_pGk4IBzoixCyx53bXMNs5FkcPrakBBxMPqDWmmBoCktQQAvD_BwE

*Elevation - One of the variables we found recently that helps with wintering success is elevation. Colonies stored at higher elevations are able to be moved out of wintering sheds in March for cleansing flights. This is the final step of wintering is allowing bees to complete cleansing flights before they succumb to Nosema or other diseases.

Tuesday, July 4, 2023

Beekeeper's Town Hall Meeting

Alaska beekeepers are invited to the first annual Beekeeper's Town Hall Meeting


Where: Interior Distance Education of Alaska (IDEA)

            2157 Van Horn Road; Fairbanks, Alaska 99701

When: Tuesday, July 11, 2023 from 6-8PM.

Guest Experts:

  • Robert Snyder, Bee Informed Partnership
  • Ben Sallmann, Bee Informed Partnership, Minnesota University
  • Jonathan Hofland, Vacaville, CA Queen Breeder & Bee Package Producer

Agenda:
  • Identifying & resolving honeybee diseases
  • Queen grafting & rearing
  • Successful wintering of colonies in Fairbanks, Alaska
  • And more . . . Please bring your questions!


To attend virtually, please use the following link:

Microsoft Teams meeting

Join on your computer, mobile app or room device

Click here to join the meeting

Meeting ID: 283 634 081 181
Passcode: 64oFK2

Download Teams | Join on the web

Learn More | Meeting options


Monday, June 26, 2023

Recovering from a Nectarless Spring & Adding honey supers

HONEY SUPER BOXES:

I will be adding honey supers this week. These are the medium boxes on the top of the upper brood box.


I predict two medium honey super boxes will be sufficient this season.


In the first seven or so years, I used a queen excluder to keep queens from laying eggs in the honey frames. 

I no longer use a queen excluder for this purpose because it creates a challenge for the bees to squeeze through the steel grates to store nectar. This slows them down, decreasing honey production. For new honey frames with no honeycomb, the bees tend to seal off the queen excluder with wax, creating a ceiling which impedes honeycomb from being built and utilized for nectar storage. 

Most always my experience has been that if a queen lays eggs in a honey super box, she only does this in two or three frames, not the entire box. She seems to know this is where the honey will be stored. After the initial two or frames of pupa hatch out, the wax cells are recycled to be used for honey stores.

What I use queen excluders for is storing equipment to keep rodents from eating the honeycomb and building nests in the boxes during winter months. They allow fresh air to flow through the hive bodies which prevents mold and mildew. 

NECTARLESS SPRING:

The spring 2023 beekeeping season started out with one huge challenge . . . unseasonably cold temperatures which contributed to:

  • A nectarless spring, which I have only seen two other seasons in my 20 years of keeping bees in Interior Alaska;
  • Lack of food stores;
  • Low brood population build-up.

During nectarless seasons, flowering plants/trees only produce enough nectar for their own food sugars. They simply don't have enough sun to photosynthesize enough to produce extra nectar for pollinators. Pollinators then fly several miles per day with little success of finding enough nectar to bring back to their colony. 

Fortunately, Fairbanks has experiences several warm days in the past week and it appears as though we may continue to see ~70*+ days with minimal rain. This should help our honeybees to find an abundance of nectar. Keep in mind, however, the very best seasons are ones with daily sunshine and a good rain shower every day or two through out the summer.

What we can do for the rest of this season is make sure our colonies have plenty of water nearby. If you don't have a natural source of water in the near vicinity, I recommend you create a water source. 

Here are some great container options for providing water:
  • bird bath
  • kiddy pool 
  • large bowl or shallow tote
  • 5 gallon bucket
I always float twigs, or wood in the water to help bees refrain from drowning. You can add rocks or moss to the water as well.

Here's a fun NASA website to explore:

I'm being very careful to stay on top of hive checks every 10 days!

Let's pray the ladder half of summer provides a perfect balance of sunshine and rain for surplus nectar supplies. Our colonies desperately need to make up for lost time!

Saturday, June 3, 2023

June - The Swarming Month

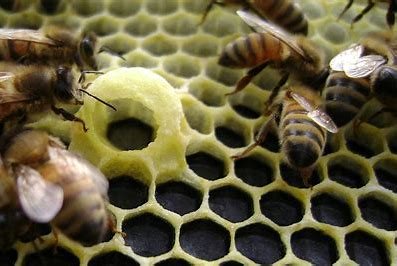
Colonies tend to desire swarming more in June than any other month. Completing hive checks every 10 days is essential! You'll know that a colony is serious about swarming when you see queen cups filled with a bed of royal jelly. If you see empty queen cups in the early stage (not completely drawn out) these are on standby in the case a colony loses a queen. When this happens, the workers create royal jelly and fill a ready made queen cup with the jelly. They steal an egg from one of the worker cells and drag this fertilized egg over to the queen cup, planting it in the middle of the royal jelly bed. The queen then emerges from her cell anywhere from 11-14 days later. 

        
Queen Cups


Queen cups with bed of royal jelly and queen larva.


Please complete hive checks every ten days!

It is not yet time to add honey supers, especially with all the ridiculously, unseasonably cold weather we've been experiencing! If colonies don't have pollen stores, you could give then a quarter pollen patty just to help them get caught back up on this. Without pollen, babies starve because they need beebread which is a mixture of pollen and nectar or honey or when these aren't available, pollen and sugar water will suffice.

Remember to follow the beekeepers calendar as a tentative guide for hive adjustments.

Unfortunately, it is getting more difficult to find replacement queens now. You can try to ship them in from this company: https://www.koehnen.com/contact

If you lose a queen there are three choices:

#1 - Order a new queen and when she arrives, hang her for a minimum of five days in the middle of the top brood box to prevent the bees from killing her. They need time to get used to a new queen's pheromones. I tape the cap onto the queen cage to make sure she does not escape the cage prematurely. On the fifth day after hanging the new queen, I take the cap off, and scoop about half of the sugar candy out of the cage tunnel. 

#2 - Allow your colony to create a new queen. There must be eggs present for this to happen. If you remove all the queen cups and cells with royal jelly/queen larva before you determine you have lost a queen, then there's no chance for the colony to create a new queen. This is why we must make sure we have a queen or see evidence of a queen having laid eggs in the past couple days before removing all queen cells during hive checks. To allow a colony to create a new queen, we must make our best choice of available queen cells, removing all other queen cells and/or cups. This prevents more than one queen hatching out within the same time period, causing them to battle to the death. This can cause  queens injuries and possible death. 

#3 - Combine your queenless colony with a colony that has a queen. This is done by placing several sheets of paper over the top hive body box of the queenless hive. (I like to use the Fairbanks Daily News paper without ink printed on it). Make about 5 two-inch slices in the paper with your hive tool to give the bees an area to start tearing away and eating the paper. This method works great in most cases and this slow combining of the two colonies helps them to become acquainted gradually so there is less fighting.

I plan to wait until I see the brood nest in each of my colonies extend below the top box and down into the middle frames of the top brood box to swap the positions of the boxes. When I see the brood next spanning both brood boxes, I will put the bottom box on the top and the top on the bottom.

Whenever I see rainy days and temperatures lower than 40*, for more than a few days, I give each colony a small square of pollen so the queen doesn't stop laying. Remember, our main goal this time of year is to get the worker population as high as possible to prepare for the huge honeyflow when all the flora is at it's peak of the summer. This usually occurs between the last week of June and the first couple weeks of August. I suspect for Interior Alaska this season, everything will be a couple weeks later than usual.

I hope you're enjoying this beautiful adventure!

:) Dawn


Friday, May 26, 2023

Spring Adjustments

 All of my hives have a second hive body added at the bottom now. I pulled one or two frames with plenty of pupa into the (new) bottom brood box. My entrances have been set at medium or completely removed on warm days (50* or warmer). Internal insulation has all been removed. I suspect external insulation will be removed the first week of June. There is plenty of pollen available for the bees to forage, so no need for feeding pollen patties. And as soon as dandelions are prolific, all sugar water feeders will be removed.

I continue to complete hive checks every ten days, making sure I see eggs and/or queens before removing queen (supersedure) cells.

When completing hive checks, I bring a small container for harvesting wax and a spray bottle with 1:1 sugar water for keeping the bees calm and less aggressive. My hive checks are done mid-day while many of the workers are out foraging. This helps me to see into the cells better and the colony is less aggressive as well.

I can't stress enough how important completing hive checks every 10 days is. "Just Do It!"

Saturday, May 13, 2023

Hive checks, preventing swarming and trouble shooting

 I complete comprehensive hive checks 10 days.  If you miss a hive check your colony is in danger of swarming and if your queen has gone missing and you don't catch this early enough, your female worker bees will develop ovaries due to the absence of the queen's pheromones. The result is laying workers who lay strictly unfertilized eggs. This destroys honeycomb because all the cells become drone comb. A clear indication you have laying workers is multiple eggs in a single cell.


Remember, it is the size of the wax cell that determines whether a queen will lay a fertilized egg or an unfertilized egg. Fertilized eggs become female workers, and the females should make up 90% of the colony population.

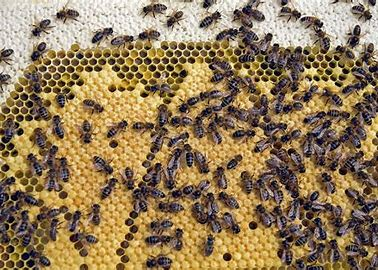
In the photo above, the flat pupa cells in the middle are female worker cells. The convex cells that protrude more on either side of the worker cells are drone cells. These will become male bees who don't have stingers which means they can't protect the hive and they don't forage because they can't fly as far as female worker bees and they don't have a long enough proboscis (tongue) to forage for nectar.

The only effective way I know of to remedy a laying worker problem is to lay a large white sheet on the ground at least 50 feet away from the hive and even better would be on the opposite side of a structure (house, shed, barn) from the hive. Then take one or two frames at a time and walk them over to the sheet. Shake all the bees off the frames onto the middle of the sheet. Then place the frames in a cooler or tote with a lid. Keep doing this until every frame has been shaken over the sheet. Once all frames are free of bees and in the secure storage box, put the frames back into the hive box(es). Believe it or not, the bees who have not yet developed ovaries and started laying unfertilized eggs will not allow the egg-laying workers back into the hive.

The best way to avoid this is to keep checking your bees every 10 days. Once you determine you definitely have a queen, by seeing her and/or evidence by cells with single eggs or larva laying at the back of many cells, you must remove all queen cells. This prevents swarming which causes your colony population to decrease by at least 50%. 

Remember, one of your main goals is to help your colony increase population before the honeyflow, which occurs the entire month of July and beginning of August. Removing all queen cells is absolutely necessary and should be done meticulously!


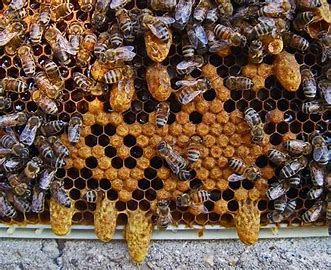
It only takes 14 days for a fertilized egg, that is fed royal jelly for its entire metamorphosis, to become an adult queen. Here are some photos of queen cells preparing to hatch:


When completing hive checks, I start on one side of the hive box. Pulling frames out of the middle of the hive can increase chances of smashing the queen. 

Pulling frames out of the hive slowly, I look closely into the back of the cells for eggs, larva, pollen and nectar stores. Here is what a healthy brood pattern should look like:


The white wax cells at the top is stored sugar water or honey. The open cells are mostly pollen stores. The pupa cells are usually in the shape of a large oval with a few open cells. 

Below is a photo of a spotty queen. This is undesirable!


If I end up with a spotty queen, it means she was not well bred in the first three to five days of her life when she was fertile and completing mating flights. Perhaps the weather was not conducive to mating flights. I tend to put a spotty queen back into a small queen cage and hang it in the hive until I find a new queen to introduce. Once I find another queen, I remove the original, spotty queen and hang the new queen cage right smack dab in the middle of the hive between two frames, leaving the cap on. I don't want the new queen released too soon or the colony may kill her. I keep the new queen caged for minimum of five days before removing the cap so the bees can eat the fondant, slowly releasing the queen.

I am still feeding my colonies sugar water. They seem to be finding plenty of pollen now from willow, and now the birch trees. I won't give them any more pollen patties until I see rain forecasted for many days in a row. If they aren't able to forage due to rain or cold weather, some breeds of queens will slow down or completely stop laying eggs until the bees can bring in more resources again once the weather improves.

I will stop feeding sugar water when three or more frames are full of sugar water stores. It is super important for the queen to have space to lay eggs. If she doesn't have room to lay, she may leave the hive.

When I see plenty of dandelions, I remove my sugar feeder because these flowers are the first natural source of nectar.

I am reducing my entrances to the smallest setting at night and opening them up completely by removing the sticks in the morning on 40*45* mornings.

I think I'll be adding my second boxes under the first brood box next weekend, Sunday, May 21st.

Saturday, April 15, 2023

Keeping bees alive this spring.

 Hello Interior Alaska Beekeepers!


This is one of four difficult springs I've experienced over the past 20 years.

Problem: Cold temperatures and an abundance of snow. Yes, we are surrounded by tall snow banks.

Here are some ways I have used to keep my bees alive and warm.

  • Prior to hiving honeybees, I bring all equipment inside my house two days prior to colony arrival.
  • Hive bees in one brood box at a higher elevation - I live on the top of Goldmine Trail. This elevation has 5-20* warmer temperatures compared with lower elevations such as downtown Fairbanks.
  • Sugar water ratio is a tad bit above 1:1 and a couple teaspoons of Honey B Healthy or Bee Pro add essential oils to the sugar water. I make sure any sugar water is room temperature! It's very important to keep filling the sugar water feeder in the initial couple weeks. Do not let sugar water run out in the first couple weeks!
  • I always use an internal, one-gallon feeder.

I reduce entrances to the smallest possible size using an entrance reducer.

  • Once all but two frames are full of  brood or sugar water stores, stop filling the sugar feeder to make sure the queen has space to lay eggs. 
  • I will post to let folks know when I'm adding a second brood box to the bottom of the hive.
  • Extra insulation is a must - I have 1" rigid foam underneath each hive, two layers of insulation around the perimeter of each hive as well as an insulated lid and insulated follower boards inside each hive on the west and east sides of the hive box. Rigid foam can be bungy corded around the perimeter of the brood box.

  • Hives are faced mostly south and a little to the east so the early morning sun hits the bottom board to encourage early morning foraging when temperatures are 45-50* or higher.
  • Pollen patties are a must to encourage the queen to lay plenty of eggs. This image is from Mann Lake. I only use 1/16 of this large patty at a time. If the colony consumes all of it, I will add another 1/16. Usually I only utilize two or three 1/16 patties in spring. I freeze all pollen patties prior to use since they may contain wax moth larvae and freezing them kills this larvae. I make sure any pollen patty I give to my honeybees is room temperature.

  • I have sprinkled either wood ash or dirt on top of snow to make sure bees are not confusing the sky and the ground. If they fly into the snow, the succumb to immediate death.

When hiving new packages, I leave the cap on the queen cage for several days to give additional time for the colony to accept their new queen. Provided temperatures are at least 40-50* on day three or four, I open the hive(s) to remove the little pink cap on the queen cage and top off the sugar water. 


When topping off sugar water, I use a piece of foam to cover the majority of the frames while pouring to keep the cluster warm. Then I put the internal and external lids back on as quickly as possible. The first hive check can be performed in the next two weeks at 50* or warmer, since the colony is focused on establishing their new home.